Create & Enter Counts
A physical count is the process of verifying the actual quantity of inventory on hand, essential for maintaining the efficiency of your operations. Conducting regular physical counts, ideally weekly, helps capture real-time stock usage, ensuring that any discrepancies are identified and corrected.
Accurate and consistent inventory counts allow businesses to make informed decisions about stock replenishment, avoid over or under stocking, reduce waste, and improve overall profitability. By recording and comparing actual inventory counts to theoretical inventory (based on previous data such as purchases and sales), you can better manage your resources and improve financial accuracy.
To create a custom count
TO CREATE A FULL INVENTORY COUNT:
-
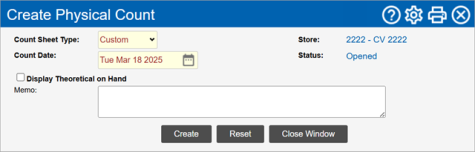
Open the Create Physical Count page.
-
Select Custom or Master from the Count Sheet Type drop-down list.
-
Select the Store from the drop-down list.
-
Select the date on which the physical count was performed from the Count Date drop-down list(s).
-
If you would like to see the expected inventory balance based on the last count entered, recent purchases and sales, place a checkmark in the Display Theoretical on Hand* box.
Click here to learn how to change the Display Theo-on Hand control in Inventory Reporting.
-
Enter any comments in the Memo section if required.
-
Click on the Create button.
-
Click on the OK button in the confirmation pop-up box A box with a prompt that opens up when you click certain links or buttons in Clearview..
-
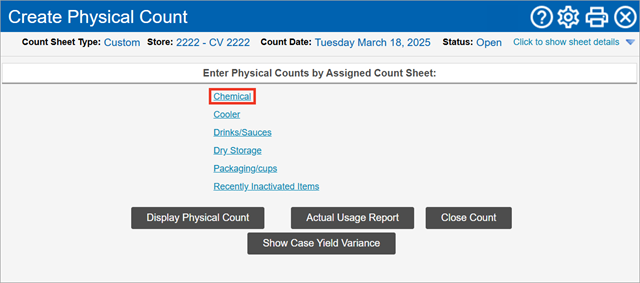
Click on the name of the sheet that you want to fill the counts for.
-
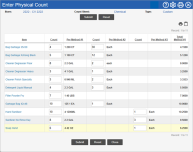
In the Enter Physical Count window:
-
Use the Sub-Category* filter Drop-down boxes that let you select from the options available., if required.
-
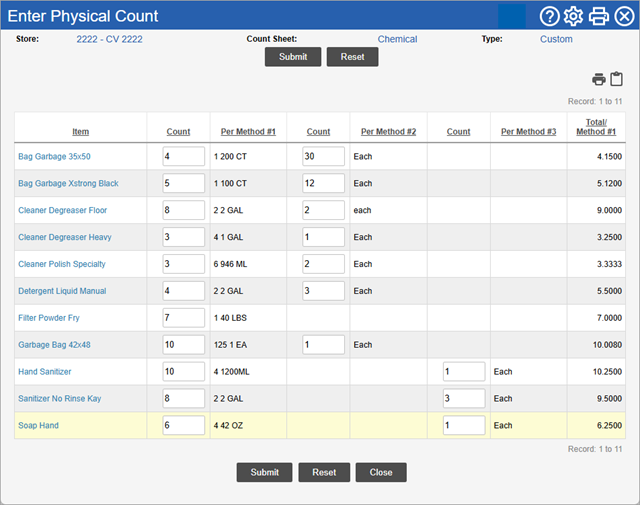
Enter the counts in the Count columns for each Item* or Product Description*.
-
Per Method #1, #2 and #3 are the package sizes in which item is stored, with Per Method #1 being the biggest unit (for example, a case of tomatoes), Per Method #3 being the smallest unit (for example, each tomato) and Per Method #2 being any units that may be in between (to illustrate, if the case of tomatoes contains 24 boxes, box would be the Per Method #2 for tomatoes). This allows you to account for inventory easily and accurately.
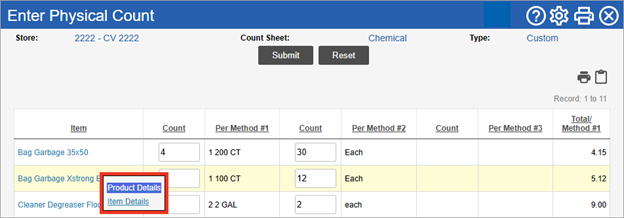
Click the Item or Product Description to access additional details including:
-
Product Details - Links to the Update Product Information page
-
Item Details - Links to the Inventory Item Information page
If the first column is labelled Product Description, the counts for each supplier product An inventory item in a package size available from a particular supplier. (if an inventory item has more than one supplier product An inventory item in a package size available from a particular supplier.) needs to be entered separately.
Click here to learn how to change the Count Entry Method in Inventory Reporting.
-
-
-
Click on the Submit button.
-
Click on the OK button in the confirmation pop-up box A box with a prompt that opens up when you click certain links or buttons in Clearview..
-
Repeat steps a to d to add or edit any counts.
-
Click on
once all counts have been entered.
-
-
If there's more than one sheet, repeat steps 9 and 10 for each of the remaining sheets.
-
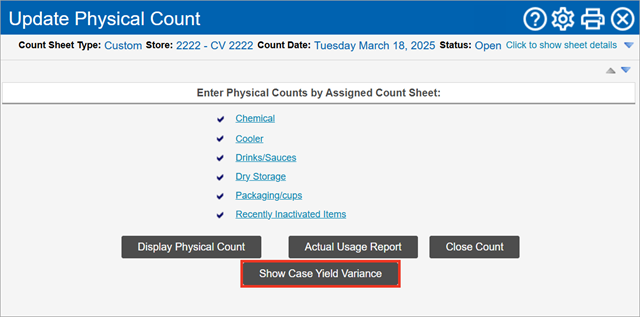
To compare the current case yield Used interchangably with sales yield, case yield is a comparison of the item usage to sales for the period. with the previous case yield Used interchangably with sales yield, case yield is a comparison of the item usage to sales for the period. click on the Show Case Yield Variance button (click here for more information).
The Show Case Yield Variance button is available only if the Show Case Yield Variance control is set to Yes..
Click here to learn how to change the Show Case Yield Variance control in Inventory Case Yield Warning settings.
-
Once you've finished filling all the sheets, click on the Close Count button.
-
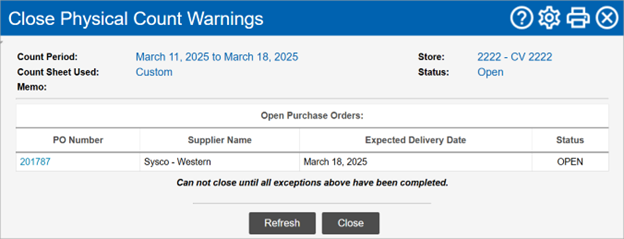
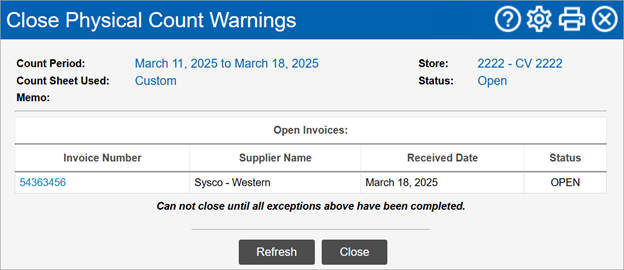
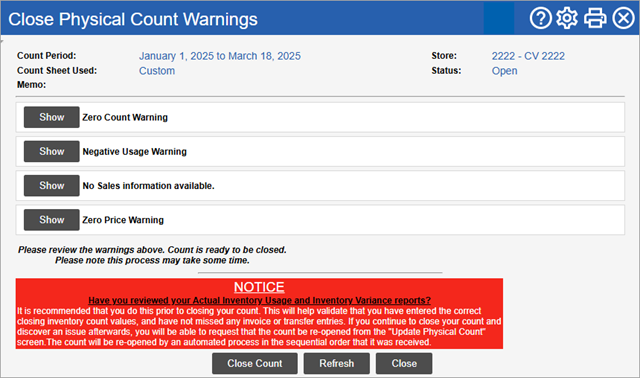
In the Close Physical Count Warnings window:
-
If Open Purchase Orders are displayed on the page:
-
Click on the PO Number* of an open PO Purchase Order.
-
Click on the Turn PO Into Invoice button in the Update Purchase Order window.
-
In the Create Invoice window:
-
Enter the Invoice Number.
-
Check the Invoice Date and change it if required.
-
Check the Date Received and change it if required.
-
Enter any notes for internal use in Internal Memo if required.
-
Click on the Create button.
-
Click on the OK button in the confirmation pop-up box A box with a prompt that opens up when you click certain links or buttons in Clearview..
-
Check the Tax^, Shipping and Rebate/Discount figures with the invoice received from the supplier, and update the values if required.
-
Click on the Update button if you made any changes to the figures.
-
To make changes to the quantity or price of existing supplier products:
-
Click on the View Invoice Details button.
-
In the Invoice Details window:
-
Make changes to the Qty Received and Unit Cost as required.
Changing the Unit Cost will update the Current Price of the Supplier Product for the store once the invoice is closed.
-
Click on the Submit button.
-
Click on the OK button in the confirmation pop-up box A box with a prompt that opens up when you click certain links or buttons in Clearview..
-
-
-
If you don't need to make any more changes to the invoice, click on the Close Invoice button.
-
Click on the OK button in the confirmation request pop-up box A box with a prompt that opens up when you click certain links or buttons in Clearview..
-
-
Repeat the steps for each open PO Purchase Order.
-
-
If Open Invoices are displayed on the page:
-
-
Click on the Invoice Number
-
In the Update Invoice window:
-
Validate the Invoice Number.
-
Check the Invoice Date and change it if required.
-
Check the Date Received and change it if required
-
Enter any notes for internal use in Internal Memo if required
-
Check the Tax^, Shipping and Rebate/Discount figures with the invoice received from the supplier, and update the values if required.
-
Click on the Update button if you made any changes to the figures.
-
Click Close Invoice.
If any warnings are displayed in the Invoice Warnings window, complete the steps on screen to resolve them, then click Submit Updates And Close Invoice. -
Click on the OK button in the confirmation request pop-up box A box with a prompt that opens up when you click certain links or buttons in Clearview..
-
-
-
-
If Open Transfers are displayed on the page:
-
If the Status of a transfer is Pending Approval:
-
Click on the transfer date of the open transfer.
-
In the Update Transfer window:
-
Enter any notes for internal use in Memo if required.
This field is mandatory if the transfer is being rejected.
-
Click on the Approve or Refuse button to approve or reject the transfer, respectively.
-
Click on the OK button in the confirmation request pop-up box A box with a prompt that opens up when you click certain links or buttons in Clearview..
-
Click on the OK button in the confirmation pop-up box A box with a prompt that opens up when you click certain links or buttons in Clearview.*.
-
-
Repeat the steps for each open transfer that's Pending Approval.
-
-
If the Status of a transfer is In Progress:
-
Click on the transfer date of the open transfer.
-
In the Update Transfer window:
-
Place a checkmark in the Remove column of an item if you want to remove the item.
-
To add more items:
-
Click on the Add Products* button for finished goods or look up the raw materials using the Search* bar.
-
In the Add Transfer Items*/Add Products to Transfer* window:
-
Enter the Quantity* of the finished product or raw material being transferred as per each method in the Transfer* column.
-
Per Method #1, #2 and #3 are the package sizes in which item is stored, with Per Method #1 being the biggest unit (for example, a case of tomatoes), Per Method #3 being the smallest unit (for example, each tomato) and Per Method #2 being any units that may be in between (to illustrate, if the case of tomatoes contains 24 boxes, box would be the Per Method #2 for tomatoes).
-
-
Click on the Submit button.
-
Click on the OK button in the confirmation pop-up box A box with a prompt that opens up when you click certain links or buttons in Clearview..
-
-
-
Make the changes to the quantities as required.
-
Click on the Update Transfer button.
-
Click on the OK button in the confirmation pop-up box A box with a prompt that opens up when you click certain links or buttons in Clearview..
-
If the transfer is with an internal store:
-
Click on the Request Approval button.
-
Click on the OK button in the confirmation request pop-up box A box with a prompt that opens up when you click certain links or buttons in Clearview.*.
-
Click on the OK button in the confirmation pop-up box A box with a prompt that opens up when you click certain links or buttons in Clearview..
-
-
If the transfer is with an external store:
-
Click on the Close Transfer button.
Clicking on the Close button will close the transfer window but will not complete the transfer. If you happen to close the transfer window, you will have to edit the transfer and complete it by clicking on the Close Transfer button.
-
Click on the OK button in the confirmation request pop-up box A box with a prompt that opens up when you click certain links or buttons in Clearview..
-
Click on the OK button in the confirmation pop-up box A box with a prompt that opens up when you click certain links or buttons in Clearview..
-
-
-
Repeat the steps for each open transfer that's In Progress.
-
-
-
Review the warnings displayed by clicking on the Show button next to each warning to see the details:
-
Indicates that the physical count for the items in the list is zero.
-
Verify that the quantity on-hand for the items in the list is actually zero.
-
Indicates that the count that you entered for the items listed is more than physically possible (i.e. count entered > the last closed count A physical count recorded in Clearview, with the Status as Closed (i.e. the count has been saved using the Close Count button). for your store + purchases + transfers in - transfers out - inventory used). This implies that you have gained inventory that has not been accounted for in CLEARVIEW.
-
Verify the count entered is correct and that all purchases and transfers for the item have been recorded in CLEARVIEW.
No Sales Information Available
-
Indicates that the sales information for your store for the days indicated weren't received by CLEARVIEW.
-
Verify that the end of day Completion of end of day tasks on the POS which results in EOD markers sent to Clearview. was completed for the days indicated.
-
Indicates that there isn't a price assigned to the items listed.
-
Check the last invoice for each of the items in the list and ensure that the price is recorded correctly on them.
-
-
If there are no warnings or you're satisfied that the warnings are of no concern, click on the Close Count button.
-
-
-
Click on the OK button in the confirmation request pop-up box A box with a prompt that opens up when you click certain links or buttons in Clearview..
-