
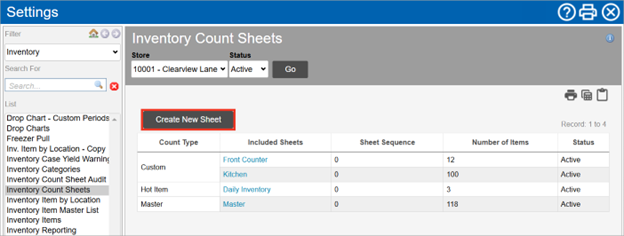
Create a New Inventory Count Sheet
The Inventory Count Sheets setting allows you to manage count sheets for each store in your organization.
To maximize efficiency, you can create custom count sheets that mirror the physical layout of your store. You can also create hot item counts for those items that need extra attention to ensure levels are monitored effectively and frequently.
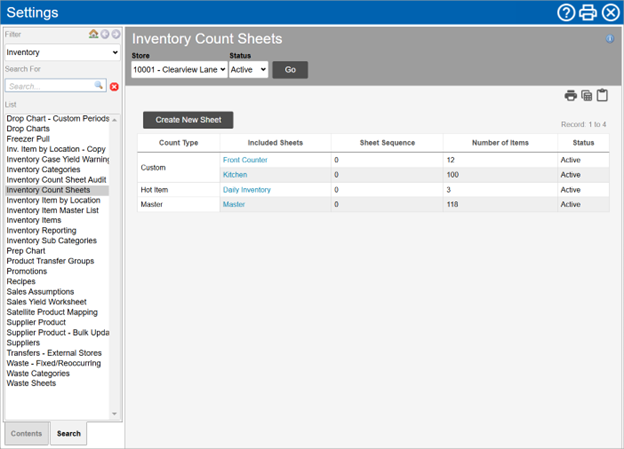
There are three types of Inventory Count Sheets:
-
Master is a single sheet that lists all active inventory items and can be arranged in a preferred sequence if required. The Master count sheet is created in CLEARVIEW by default and is automatically updated when a new item is added or the Status of an item is changed.
-
Custom count sheets is the Master count sheet broken down into smaller sheets based on different sections of the restaurant or any other basis determined by your store. This allows for a different employee to be made responsible for performing the physical counts for each custom sheet if required.
An item can be repeated in more than one Custom count sheet to account for inventory maintained in more than one location. The figures entered for the item in different custom sheets in the Create Physical Count page will be added together to provide the total inventory held.
All active inventory items must be assigned to at least one Custom Sheet. You will not be able to create a count on any Custom Sheet if there are active inventory items that have not been assigned to a custom sheet.
Click here to learn how to identify inventory items that have not been assigned to any custom sheets.
-
Hot Item count sheets are sheets that list only some inventory items (usually high-cost items) that are required to be counted on a more regular basis.
Create a New Inventory Count Sheet
-
Go to Inventory Count Sheets settings.
-
Click on the Create button.
-
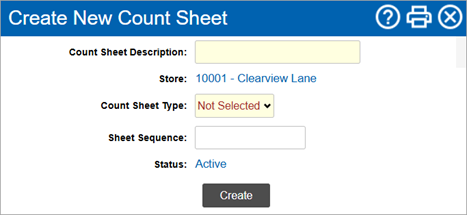
In the Create New Count Sheet window:
-
Enter a name for the sheet in Count Sheet Description.
-
Select the Count Sheet Type from the drop-down list.
-
Enter the Sheet Sequence number (count sheets are displayed in ascending order of the Sheet Sequence), if required.
-
Click on the Create button.
-
Click on the OK button in the confirmation pop-up box A box with a prompt that opens up when you click certain links or buttons in Clearview..
-
-
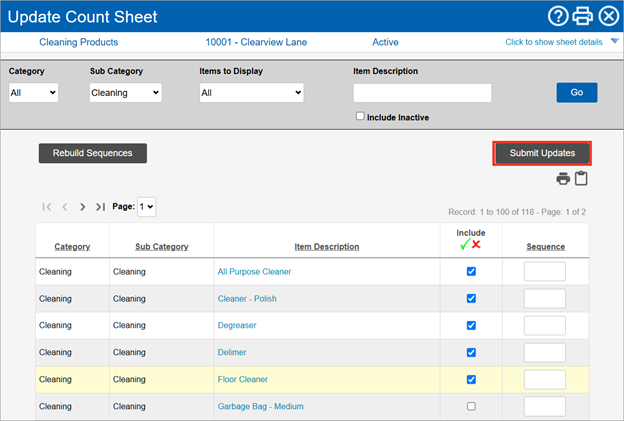
In the Update Count Sheet window:
-
Use the filters Drop-down boxes that let you select from the options available. at the top of the page and click on the Go button to find the item(s) you want to add to the sheet.
-
Place a checkmark in the Include column for each item that you want to include in the sheet.
-
Enter a number in the Sequence column for each item, if required (the items will be displayed in ascending order of the Sequence set).
Items with the same sequence number will be displayed in alphabetical order.
-
Click on the Submit Updates button.

-
Click on the OK button in the confirmation pop-up box A box with a prompt that opens up when you click certain links or buttons in Clearview..
-
Repeat steps a to e if you need to add more items.
-
Click on
 once all the items that you want are added.
-
When creating Custom Count Sheets, all active items must be assigned to at least one Custom Count Sheet before the counts can be filled in the sheets.
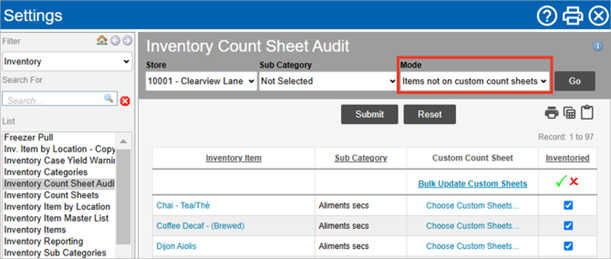
To identify items that have not been added to any Custom Count Sheet, use the Items not on custom count sheets mode in Inventory Count Sheet Audit.
Setting: Inventory Count Sheet Audit
The Inventory Count Sheet Audit page helps you identify inventory items that don't have a supplier product An inventory item in a package size available from a particular supplier. mapped to them and inventory items that haven't been added to any custom sheet.
To find items not on custom count sheets
Go to Inventory Count Sheet Audit setting.
Select the Items not on custom count sheets mode, then click .
-
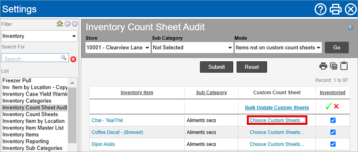
On the Inventory Item row, click the Choose Custom Sheets... link. The Choose Custom Sheets window opens.
-
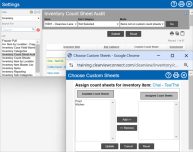
In the Available Count Sheets column on the left, click the count sheet you want to add the inventory item to. To select more than one sheet, press and hold the key while clicking each sheet name.
-
Click to move the selected sheet(s) into the Assigned Count Sheets column on the right. To remove the item from the Assigned Count Sheets column, click the sheet name, then click . The sheet moves back to the Available Count Sheets column.
-
Once your selection is defined, click . The Choose Custom Sheets window closes, and the inventory item states Changes Pending (Click Submit)in the Custom Count Sheet column.
-
To assign all the inventory items to custom sheets, click the link at the top of the Custom Count Sheet column. If you have already made selections for individual inventory items, complete the steps below before updating in bulk as the bulk action will override any pending changes that have not been submitted.
-
-
Click .
-
Click on the OK button in the confirmation request pop-up box A box with a prompt that opens up when you click certain links or buttons in Clearview..
-
Click on the OK button in the confirmation pop-up box A box with a prompt that opens up when you click certain links or buttons in Clearview..


Items added through the Inventory Count Sheet Audit setting will automatically be added to the relevant custom count sheets of an open Custom inventory count. This enhancement ensures items that were activated after the count was created can still be counted.