
Create Transfers
This page allows you to create transfers between internal stores Stores listed under your organization in Clearview., or stores that are part of your organization, as well as external stores Any store or entity that is not listed under your organization in Clearview..
TO CREATE AN INTERNAL TRANSFER:
Items transferred between internal stores Stores listed under your organization in Clearview. will reflect in the inventory of both stores through a single transaction. Hence both stores should not create a transfer for the same transaction, as doing so would account for the transfer twice in both stores.
-
Go to the Create Transfer page.
If a similar transfer was created earlier, you can copy and edit the transfer. Click here to learn how.
-
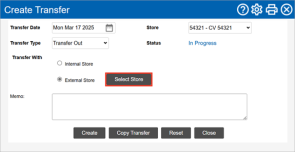
Select the Date on which the transfer was made from the drop-down list.
-
Select your Store from the drop-down list.
-
Select the Transfer Type from the drop-down list.
-
Select Internal Store from the Transfer With* drop-down list.
-
Select the store with whom the transfer is being made from the drop-down list.
-
Click on the Select Transfer* button.
The Select Transfer button is available only if the Transfer Type selected is Repayment.
-
Select the original transfer being repaid from the Outstanding Transfer Query window.
-
-
Enter any notes for internal use in Memo if required.
-
Click on the Create button.

-
Click on the OK button in the confirmation pop-up box A box with a prompt that opens up when you click certain links or buttons in Clearview..
-
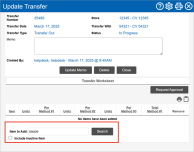
Click on the Add Products* button for finished goods or look up the raw materials using the Search* bar.
-
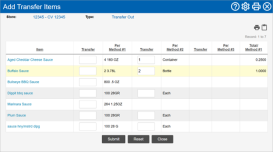
In the Add Transfer Items*/Add Products to Transfer* window:
-
Enter the Quantity* of the finished product or raw material being transferred as per each method in the Transfer* column.
-
Per Method #1, #2 and #3 are the package sizes in which item is stored, with Per Method #1 being the biggest unit (for example, a case of tomatoes), Per Method #3 being the smallest unit (for example, each tomato) and Per Method #2 being any units that may be in between (to illustrate, if the case of tomatoes contains 24 boxes, box would be the Per Method #2 for tomatoes).
-
-
Click on the Submit button.
-
Click on the OK button in the confirmation pop-up box A box with a prompt that opens up when you click certain links or buttons in Clearview..
-
-
Repeat steps 11 and 12 to add more items.
-
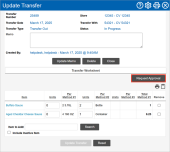
Click on the Request Approval button.
-
Click on the OK button in the confirmation request pop-up box A box with a prompt that opens up when you click certain links or buttons in Clearview.*.
-
Click on the OK button in the Transfer has been sent for approval pop-up box A box with a prompt that opens up when you click certain links or buttons in Clearview.*.
Items highlighted in red are those currently inactive at one of the stores involved in the transfer. If any of those items are added to the transfer, you will be prompted to activate them before you can complete the transfer. If you wish to proceed with the activation, click on the OK button, else click on the Cancel button, remove the affected items and request approval again.
TO CREATE AN EXTERNAL TRANSFER:
-
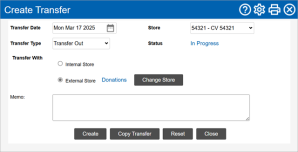
Go to the Create Transfer page.
If a similar transfer was created earlier, you can copy and edit the transfer. Click here to learn how.
-
Select the Date on which the transfer was made from the drop-down list.
-
Select your Store from the drop-down list.
-
Select the Transfer Type from the drop-down list.
-
Select External Store from the Transfer With* drop-down list.
-
Click on the Select Store button.
-
Select the store with which the transfer is being made from the Store Search Results window.
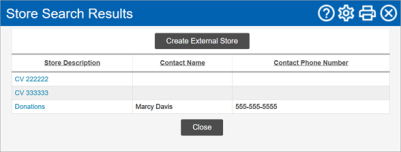 If the store does not exist, see the instructions to Create a New External Store for Transfers.
 -
Click on the Select Transfer* button.
The Select Transfer button is available only if the Transfer Type selected is Repayment.
-
Select the original transfer being repaid from the Outstanding Transfer Query window.
-
-
Enter any notes for internal use in Memo if required.
-
Click on the Create button.
-
Click on the OK button in the confirmation pop-up box A box with a prompt that opens up when you click certain links or buttons in Clearview..
-
Click on the Add Products* button for finished goods or look up the raw materials using the Search* bar.

-
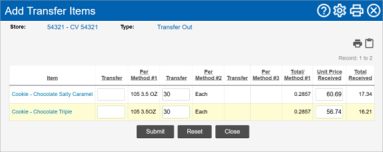
In the Add Transfer Items*/Add Products to Transfer* window:
-
Enter the Quantity* of the finished product or raw material being transferred as per each method in the Transfer* column.
-
Per Method #1, #2 and #3 are the package sizes in which item is stored, with Per Method #1 being the biggest unit (for example, a case of tomatoes), Per Method #3 being the smallest unit (for example, each tomato) and Per Method #2 being any units that may be in between (to illustrate, if the case of tomatoes contains 24 boxes, box would be the Per Method #2 for tomatoes).
-
-
Click on the Submit button.
-
Click on the OK button in the confirmation pop-up box A box with a prompt that opens up when you click certain links or buttons in Clearview..
-
-
Repeat steps 12 and 13 to add more items.
-
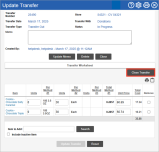
Click on the Close Transfer button.
Clicking on the Close button will close the transfer window but will not complete the transfer. If you happen to close the transfer window, you will have to edit the transfer and complete it by clicking on the Close Transfer button.
-
Click on the OK button in the confirmation request pop-up box A box with a prompt that opens up when you click certain links or buttons in Clearview..
-
Click on the OK button in the confirmation pop-up box A box with a prompt that opens up when you click certain links or buttons in Clearview..
Items highlighted in red are those currently inactive at your store. If inactive items were added to the transfer, you will be prompted to activate them before you can complete the transfer. If you wish to proceed with the activation, click on the OK button, else click on the Cancel button, remove the affected items and request approval again.
As soon as the creation of the transfer is complete (either by requesting approval or closing the transfer) the stock level of the inventory items/supplier products included in the transfer will be adjusted by the quantity transferred for the store that created the transfer.