Create & Edit a Forecast
Forecasts are created using an average of your past sales captured in CLEARVIEW. To ensure reliable results, make sure your sales data is accurate before you begin creating forecasts.
The steps to create your forecast depend on the configuration of the Forecasting setting. The following outlines creating a forecast with preset defaults.
TO CREATE A FORECAST:
This process generates the financial, product mix and schedule forecasts together.
-
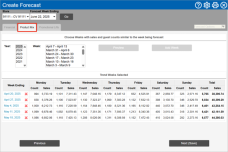
Open the Forecasting page.
-
Select the Area* and Store for which you want to create the forecast from the drop-down list(s).
-
Select Financial from the View drop-down list.
-
Click on the Go button.
-
Click on the Create button.
-
In the Create Forecast window:
-
Select the Area*, Store and Forecast Week Ending for which you want to create the forecast using the drop-down lists.
-
Click on the Go button.
-
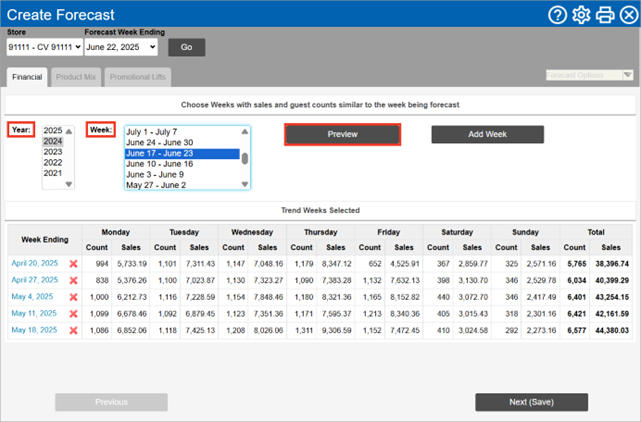
In the Financial tab:
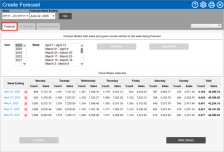
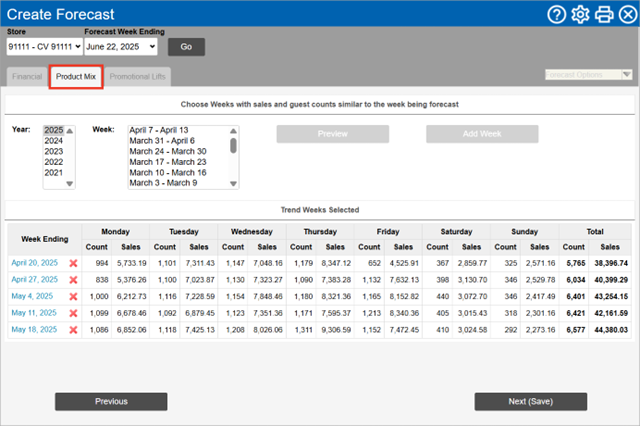
Select the weeks that will be used to calculate your base sales forecast.
Depending on your Trend Week Defaults controls, CLEARVIEW will auto-populate the Trend Week Selected section with past weeks that have completed sales data.
To add trend weeks:
-
Select the Year in which one of the weeks that you'd like to use as a reference for the financial forecast falls in.
-
Select the Week.
-
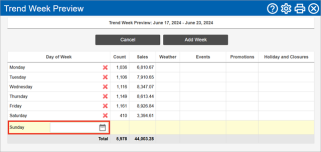
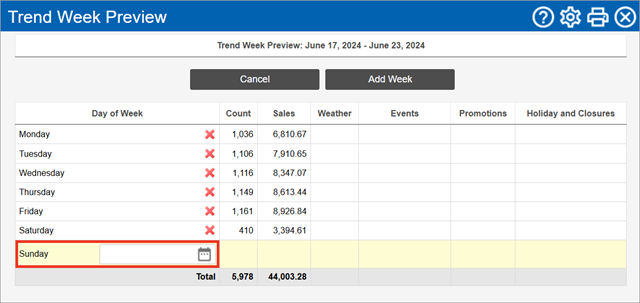
Click on the Preview button to view the data for the week if required.

-
To remove certain days (in case the data is not representative of a typical day) click on
 next to the day and then click on
  to select a replacement day.
-
-
Click on the Add Week button to include the week in the Trend Weeks Selected.
-
Repeat steps i to iv for each week that you'd like to add.
The number of weeks you can select may be restricted by the controls selected in Forecasting settings.
Click here to learn how to change the Financial Options controls in Forecasting.
To remove a week from Trend Weeks Selected:
-
Click on
next to the Week Ending to remove the week.
-
Once you have your trend weeks Past weeks that can be considered the trend for the week being forecasted. The data of trend weeks is used in the calculation of forecasts. set, click on the Next (Save) button.
-
-
In the Product Mix tab:
Select the weeks that will be used to calculate your base Product Mix forecast. The same options are available to select trend weeks Past weeks that can be considered the trend for the week being forecasted. The data of trend weeks is used in the calculation of forecasts..
Depending on your Trend Week Defaults controls, CLEARVIEW will auto-populate the Trend Week Selected section with past weeks that have completed sales data.
Click here to learn how to change your Trend Week Defaults for Product Mix in Forecasting.
-
Once you have your trend weeks Past weeks that can be considered the trend for the week being forecasted. The data of trend weeks is used in the calculation of forecasts. set, click on the Next (Save) button.
-
-
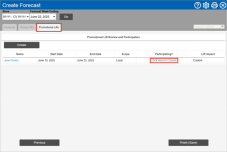
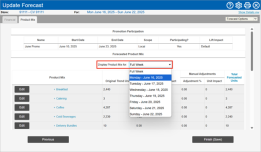
In the Promotional Lifts tab:
-
Click on the Click here to Choose link to opt in or out of any promotions created by your support team (if any).
-
Select Yes or No from the Participating? drop-down list to opt in or out of each of the promotions.
Opting out of a promotion will disregard all lifts that are included in the promotion when creating the forecast. However, your store could still offer the promotion to your customers.
Promotions can be created as part of the Forecast creation or in advance.
-
Click on the Finish (Save) button once done.
-
Your baseline forecast has now been created and is ready to fine-tune to account for known variables.
-


TO EDIT A FORECAST:
-
Open the Forecasting page.
-
Select the Area* and Store for which you want to edit the forecast from the drop-down list(s).
-
Select Financial from the View drop-down list.
-
Click on the Go button.
-
Click the forecast link in the Week Ending column.
-
In the Update Forecast window:
-
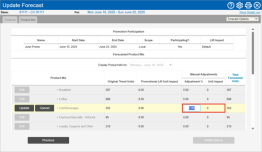
Financial Tab
-
Click on the Edit button next to the level you want to adjust.
-
To adjust the transactions count and sales forecast by the same percentage, enter the percentage in the Update Count & Sales column for the period.
-
To adjust the count and sales by different percentages, click on the Forecast Adjustment % >>> link and then enter the percentages in the Update Count Only and Update Sales Only columns.
-
Click on the Update button.
-
Click on the Next (Save) button.
-
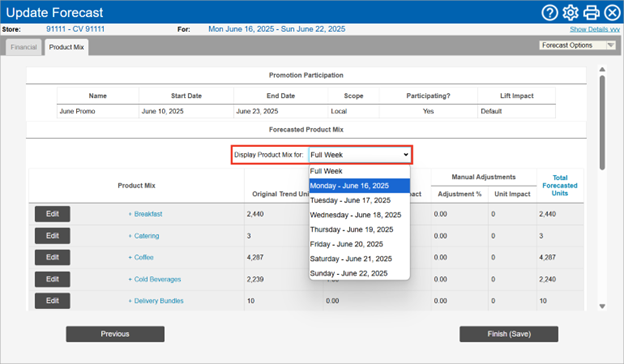
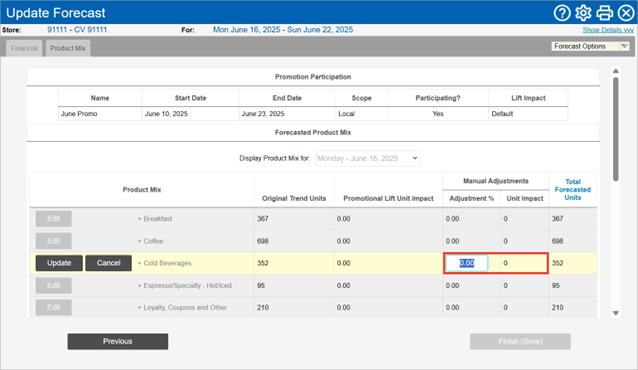
Product Mix Tab
Inputs can be applied to the Product Mix, Product Group or menu item for the entire week, or specific days. Click the links to expose the level of granularity you want to apply the adjustment.
-
Select the day for which you want to adjust the product mix forecast from the Display Product Mix for drop-down list.
Select Full Week from the Display Product Mix for drop-down list to adjust the forecast by the same percentage for the entire week. -
Click on the Edit button next to the level you want to adjust.
-
Enter the percentage by which you want to adjust the forecast in the Adjustment % column.
-
Click on the Update button.
The percentage entered will be modified by CLEARVIEW to obtain the nearest whole number of units.
-
Inputs can be applied to the week, the day, the day part or time period. Click the links to expose the level of granularity you want to apply the adjustment.

-
Click on the Finish (Save) button.
Once generated, a forecast is static and will not change based on new sales and general information logged into CLEARVIEW.
If you generate forecasts for more than one week into the future, it's best to check the forecasts at the end of each week to ensure its credibility, and edit or regenerate it (only trend weeks Past weeks that can be considered the trend for the week being forecasted. The data of trend weeks is used in the calculation of forecasts. selected for the financial forecast cannot be changed through the edit process), if necessary. To regenerate a forecast, you will have to delete the forecast and then generate it once again.
-