Create a Schedule
Creating templates for the shifts that repeat during a day or week makes creating the schedule faster as it forms the basic structure on which the schedule can be created. Templates can contain as little or as much information as you'd like to include (you can include unassigned shifts, shifts with jobs and/or employees assigned, etc). The key is to include only the attributes that will repeat.
Creating a template needs to be done just once (for each template) and can be used to create schedules as often as you require.
Templates can be created for a certain day (holiday on which your store is open, events, etc.) or for a week.
TO CREATE A SCHEDULE FROM A TEMPLATE
Applying a template to a day/week will first clear the day/week of all shifts and then apply the template. Applying one template after another to a period will not combine the shifts from the templates. Hence, if you need to apply one or more daily templates and a weekly template to the same week, you need to first apply the weekly template and then apply the daily template(s), and keep in mind that the daily template(s) will overwrite the shifts created by the weekly template.
-
Open the Schedule - New page.
-
Select the store from the drop-down list at the top of the page.
-
Select Day if you want to create the schedule for only a day, or Week if you want to create the schedule for a week.
-
Click on the date or week ending at the top of the page, and then select the day or week for which you want to create the schedule.
-
Click on
 in the top-left corner of the page.
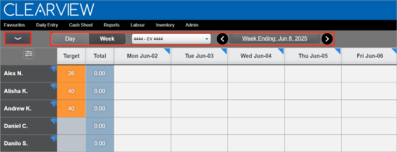
-
Click on the Tools button.
-
Check that the message There are no shifts available for the selected period shows below the button.
If you don't see the message, you might want to make a note of the shifts so that you can recreate them after the template is applied.
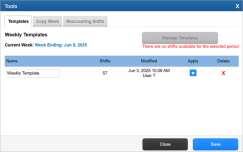
Any existing shifts for the day or week will be deleted by CLEARVIEW before the template is applied.
-
Click on
 for the template that you want to apply.
 -
Click on the button in the confirmation request pop-up box A box with a prompt that opens up when you click certain links or buttons in Clearview.*.

![]()

-
Now that your template is applied, you can adjust the schedule to ensure you have appropriate coverage.
To add a shift to the schedule:
-
Click on
in the top-left corner of the page. -
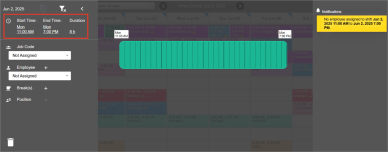
Click on the Add Shift button.

-
Click on the Start Time and then select the time at which you'd like the shift to start.
-
If you would like to change the length of the shift, click on the Duration of the shift and change the duration as required.
The default shift length can be managed in the Shift tab in Settings.
-
If the shift was meant to be created for a different day:
-
Click on
 or anywhere outside the shift to go back to the schedule.
 -
Click and drag the shift bar in the grid and move it to the desired day.
-
-
-
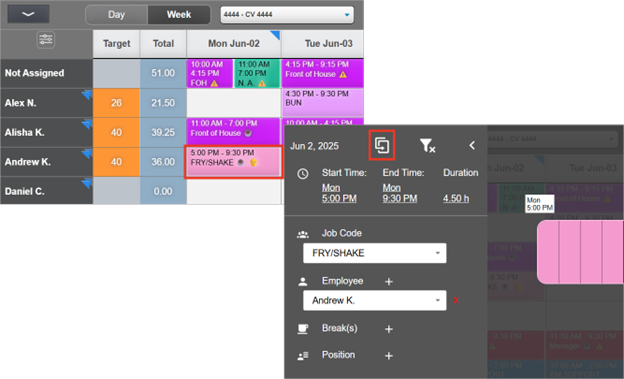
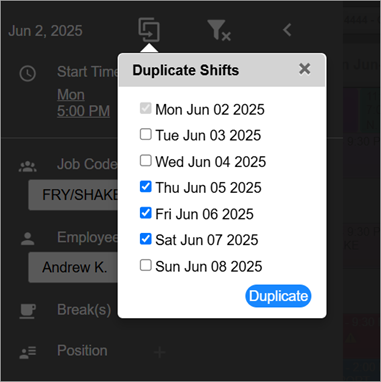
To copy a shift to other days:
-
Double click on the existing shift that you want to copy.
Only shifts assigned to an employee can be copied.
-
Click on
 .
.
-
Place a checkmark next to each of the days that you want to copy the shift to.
-
Click on the Duplicate button.

-
-
To delete a shift:
-
Double click on the shift bar in the grid.
-
Click on
 .
. -
Click on the button in the confirmation request pop-up box A box with a prompt that opens up when you click certain links or buttons in Clearview..
OR
-
Click and hold on the shift bar in the grid until the trash can icon appears and then drag it to the trash can.
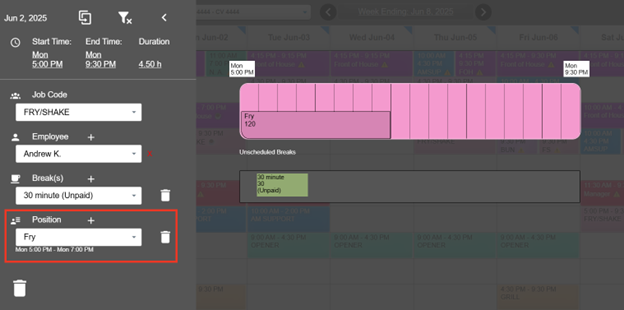
To edit an existing shift
-
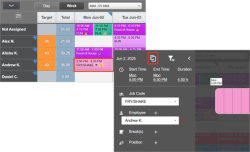
Double click on a shift to add details to it.
-
Adding or changing details like job, employee and staff positions Different from jobs, positions (or staff positions) are specific roles that employees can take on during a shift (like Cashier, Drive Thru Order Taker, Fry Cook, etc.) and can be used to ensure that all positions are covered when creating a schedule. automatically applies constraints to the other fields in the window (learn more). To remove these filters Drop-down boxes that let you select from the options available., click on
 .
. -
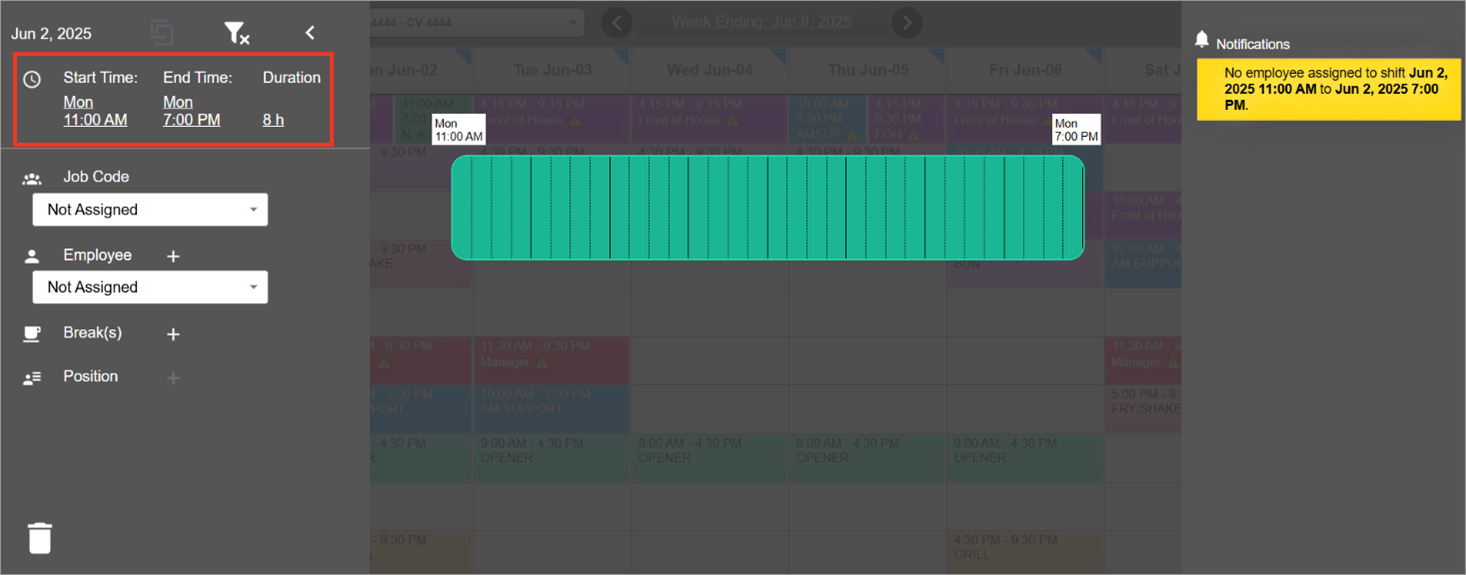
Notifications regarding the shift are displayed in the right panel.
To add a job to the shift:
-
Select the Job Code from the drop-down list.
To add an employee to the shift:
-
Select the Employee from the drop-down list.
You can assign multiple employees (as long as they've been assigned the same job code) to the shift by clicking on
 next to Employee. A new shift will automatically be created for each employee, with the same shift parameters.
Only employees actively assigned to a store can be scheduled at the store.
The store(s) an employee is assigned to can be managed in the Store Assignment tab of the electronic employee file.
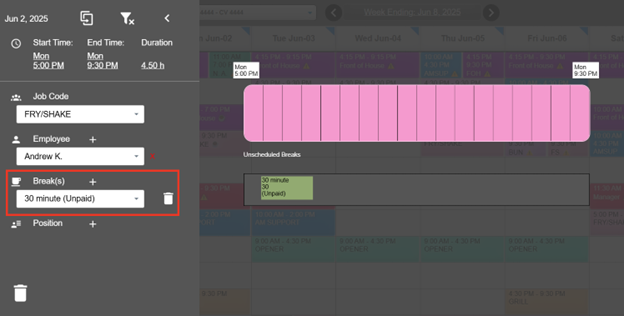
To add breaks to the shift:
Multiple breaks can be added to the shift, if required.
-
Click on
next to Break(s). -
Select the type of break from the drop-down list.
The types of breaks available can be managed through the Breaks Template tab in Settings.

-
To schedule the break, click and hold the break for a second and then drag it to the shift to the time you want to schedule it (the time is indicated below the shift as you move the break through the shift).
-
To remove a break from the shift (to make it unscheduled), click and hold the break for a second and then drag it down to the Unscheduled Breaks bar that appears.
-
Repeat steps i to iv to add more breaks to the shift.
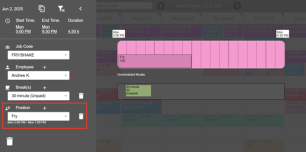
To add staff positions to the shift:
Staff positions Different from jobs, positions (or staff positions) are specific roles that employees can take on during a shift (like Cashier, Drive Thru Order Taker, Fry Cook, etc.) and can be used to ensure that all positions are covered when creating a schedule. must exist for your store before you can assign them to shifts.
Click here to learn how to manage staff positions Different from jobs, positions (or staff positions) are specific roles that employees can take on during a shift (like Cashier, Drive Thru Order Taker, Fry Cook, etc.) and can be used to ensure that all positions are covered when creating a schedule. for each store in Schedule - Positions.
Multiple staff positions Different from jobs, positions (or staff positions) are specific roles that employees can take on during a shift (like Cashier, Drive Thru Order Taker, Fry Cook, etc.) and can be used to ensure that all positions are covered when creating a schedule. can be added to a single shift, if required.
-
Click on
next to Position. -
Select the staff position from the drop-down list.
Employee's skill level at each staff position can be managed in the Skill Level tab of each electronic employee file.
Click here to learn how to manage staff positions Different from jobs, positions (or staff positions) are specific roles that employees can take on during a shift (like Cashier, Drive Thru Order Taker, Fry Cook, etc.) and can be used to ensure that all positions are covered when creating a schedule. for each store in Schedule - Positions.
-
Drag the darker shade graphical bar on the shift, to the time (during the shift) that you'd like the employee to start working the staff position, and to the length of period desired.
-
Repeat steps i to iii to add more positions Different from jobs, positions (or staff positions) are specific roles that employees can take on during a shift (like Cashier, Drive Thru Order Taker, Fry Cook, etc.) and can be used to ensure that all positions are covered when creating a schedule. to the shift.