Schedule Setup
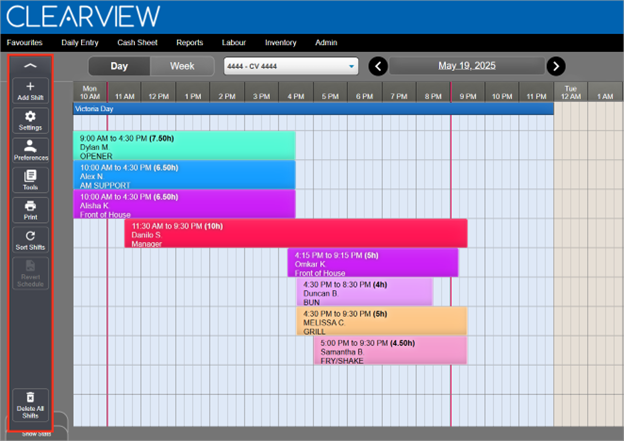
The Menu Bar provides quick access to all the key scheduling tools.
Settings
Setting up shift details, type of breaks, the statistics you want displayed with the schedule and other settings will help you create schedules faster. This set up needs to be done just once and then modified as required.
![]()
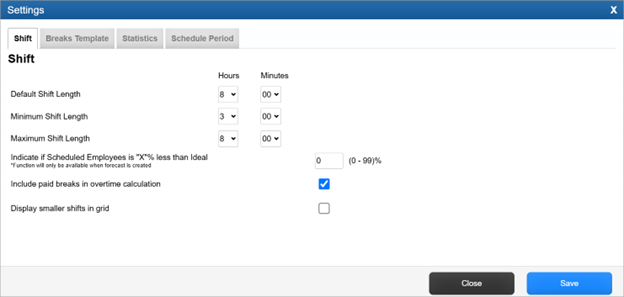
Shift
The Shift tab needs to reflect how your shifts should be created, including default shift length, guidelines for minimum and maximum shift lengths, how overtime is calculated and even the size of your shift blocks.
-
Select the default length of each new shift created in Default Shift Length.
The length of shifts created can be modified when creating a template or schedule.
-
Select the Minimum Shift Length that you want shifts to be.
Shifts can be created of a shorter duration than the minimum shift length, but CLEARVIEW will provide you with notifications informing you of the same.
-
Select the Maximum Shift Length that you want shifts to be.
Shifts can be created of longer duration than the maximum shift length, but CLEARVIEW will provide you with notifications informing you of the same.
-
Enter the percentage (of total scheduled labour hours vs total ideal hours for a period) below which you'd like CLEARVIEW to provide an indication in Scheduled Employees is "X"% less than Ideal.
The SCH figure in IDEAL vs SCH* in the Show Stats tab of the schedule will display in orange if the scheduled labour hours is less than the percentage indicator set, against IDEAL hours; or above the same threshold, against IDEAL hours.
-
Place a checkmark next to Include paid breaks in overtime calculation if you'd like breaks that are paid to be included in employee's total hours worked used to calculate overtime, or remove the checkmark if you don't want to include paid breaks.
Place a checkmark next to Display smaller shifts in grid to reduce the size of the shift blocks, or remove the checkmark if you'd like the larger display.
Smaller shifts display allows for more shifts to be seen on the grid at once but reduces the amount of detail visible on the shift blocks.
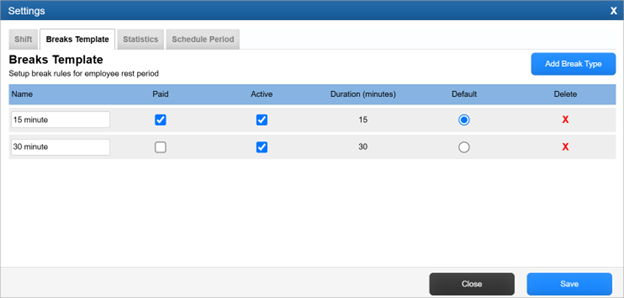
Breaks
The Breaks Template tab allows you to determine the type and length of the breaks that will be added to shifts. Create the breaks you need to match your operation.
-
To create a break template:
-
Enter a Name for the break.
-
Place a checkmark next to Paid if the break is a paid break, else leave it blank (if it's an unpaid break).
Paid and unpaid breaks impact the statistics differently depending on whether the breaks are scheduled for a specific time or not.
-
Select the Duration of the break from the drop-down list.
-
If you want the break to be available to be assigned to shifts, place a checkmark next to Active, else leave it blank.
-
If you want to set this break as the default break template, place a checkmark next to Default, else leave it blank.
Statistics
The Statistics tab lets you enable up to 5 metrics to be included in your schedule stats for performance tracking. The options offered in CLEARVIEW are quite diverse and should represent what each location needs to highlight.

-
Place a checkmark next to each of the types of statistical data you want included in Stats section at the bottom of the schedule.
-
A maximum of five data types can be included in the Stats section.
-
A sales forecast for the day/week being viewed must be available for statistical data (except for those data types indicated with an *) to be displayed in the Stats section.
-
Ideal VS Scheduled (IDEAL vs SCH) will include the total labour hours required to achieve the target SPLH Sales Per Labour Hour. It is the total sales for the period divided by the number of labour hours logged for the same period. for the period, followed by the total scheduled labour hours for the period.
-
Forecasted SPLH (SPLH) will include the estimated sales per labour hour for jobs not included in SPLH Sales Per Labour Hour. It is the total sales for the period divided by the number of labour hours logged for the same period. calculations.
-
Forecasted TPLH (TPLH) will include the estimated number of transactions per labour hour.
-
Non-SPLH Hours (N-SPLH)* will include the total labour hours scheduled for jobs not included in SPLH Sales Per Labour Hour. It is the total sales for the period divided by the number of labour hours logged for the same period. calculations, for the period.
-
Sales Forecast (Forecast $) will include the forecasted sales for the period.
-
Labour Cost Percentage (Labour %) will include the estimated cost of labour as a percentage of forecasted sales.
-
Labour Cost Amount (Labour $)* will include the projected cost of labour based on the scheduled labour hours.
-
Total Hours (T-Hours)* will include the total scheduled labour hours for each period.
-
Transactions Forecast (Forecast #) will include the estimated transactions forecasted for each period.
-
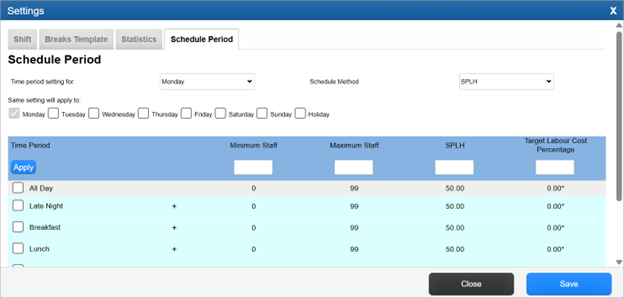
Schedule Period
The Schedule Period tab allows you to set you targets for an ideal schedule.
Targets can be applied to the full week, a specific day, day parts or even specific time periods. By making sure you have the most relevant information by using more specific time periods, the easier it will be to generate a functional schedule with accurate stats.
-
To manage how the ideal number of employees required per period is determined:
-
Click on the Schedule Period tab.
-
Select the Schedule Method that you'd like CLEARVIEW to use to determine the ideal number of employees required, from the drop-down list:
-
SPLH indicates that the sales per labour hour will be used to determine the number of employees required.
-
TPLH indicates that the transactions per labour hour will be used to determine the number of employees required.
-
Labour Guide SPLH indicates that a labour guide based on sales will be used to determine the number of employees required.
This option requires a Sales labour guide to be available.
Click here to learn how to manage labour guides in Schedule - Labour Guide.
-
Labour Guide TPLH indicates that a labour guide based on transactions will be used to determine the number of employees required.
This option requires a Transactions labour guide to be available.
Click here to learn how to manage labour guides in Schedule - Labour Guide.
-
-
Select the Labour Guide* you want to apply to schedules, from the drop-down list.
-
Select the day for which you want to manage the controls from the Time period setting for* drop-down list.
-
Place a checkmark next to each of the boxes* for the days that you want the same setting applied to.
-
Enter the Minimum Staff* that you need per period.
-
Enter the Maximum Staff* that you can have per period.
-
Enter the target Sales Per Labour Hour* that you'd like to achieve.
-
Enter the Target Labour Cost Percentage* that you'd like to achieve.
-
Place a checkmark next to each part of the day* or period*, for which you want to apply the settings entered in steps f to i.
Click on + next to a period or day part to view smaller periods.
-
Click on the button.
Day parts and time periods that have different figures for the periods grouped under them, show with an asterisk (*).
-
Repeat steps d to k to change the controls for other days and periods.
-
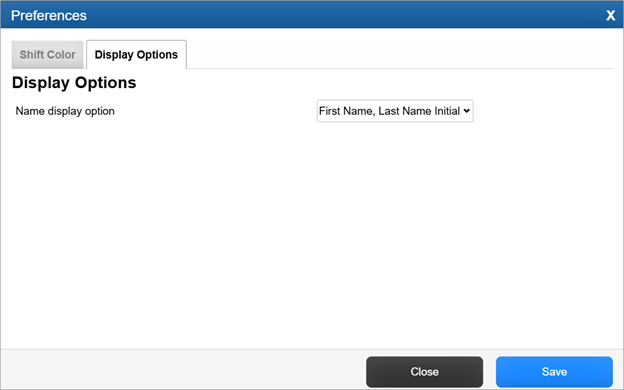
Preferences
Set visual preferences for your schedule.
![]()
Shift Colour
Colour code your schedule to easily identify coverage by job code.

-
Click on the colour bar next to a job code.
-
Select the colour you'd like to assign to the job code from the palette displayed.
Shift Colour is an organizational control and will affect all stores in the organization.
Display Options
Determine the naming convention to be included on the schedule.
Select the format in which you want the names displayed from the Name display option drop-down list.
Tools
Tools provides helpful options to quickly and easily create a schedule.
![]()
Templates
Schedule templates are the common shifts, employees and/or staff positions Different from jobs, positions (or staff positions) are specific roles that employees can take on during a shift (like Cashier, Drive Thru Order Taker, Fry Cook, etc.) and can be used to ensure that all positions are covered when creating a schedule. that repeat every period.
Templates can be created for a week, or single day and can be applied repeatedly.
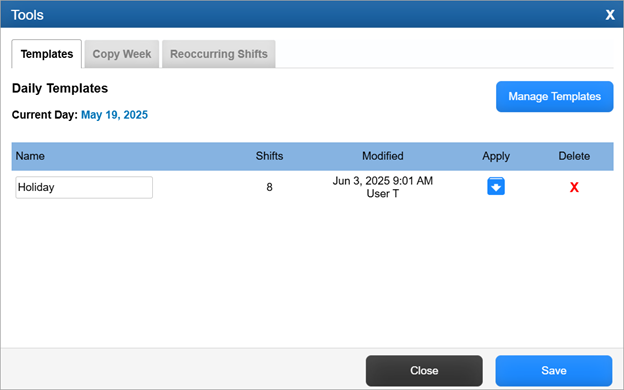
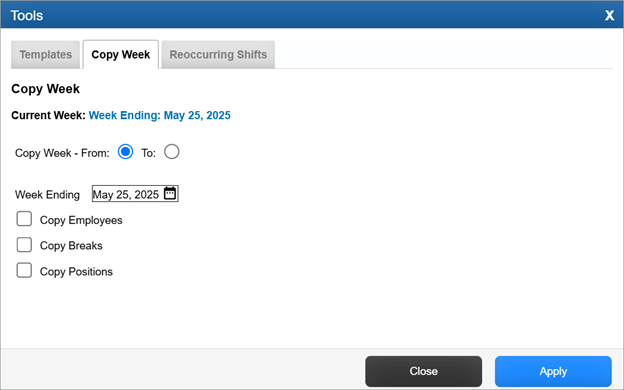
Copy Week
Quickly copy shifts, and shift details from one week to another. Select the elements to copy including:
-
Start and end time
-
Employees
-
Breaks
-
Positions