Scheduling Overview
There's a lot that you can do on the Schedule - New page. You can:
-
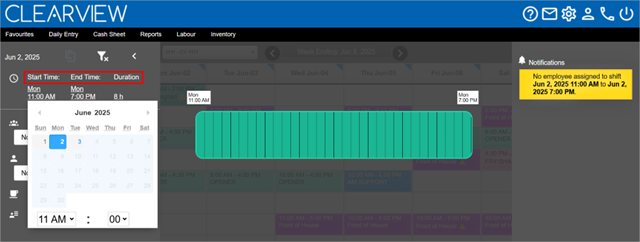
Create custom shifts: Shifts can be adjusted to any duration and can start at any time, as per your requirement.

-
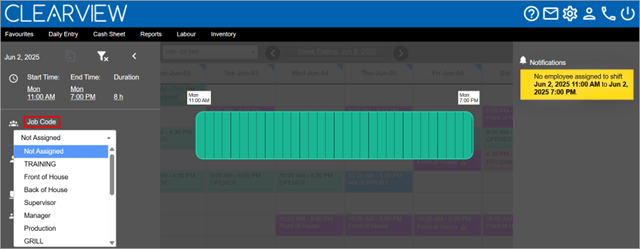
Assign jobs to shifts: Jobs can be assigned to each shift to help ensure all roles are covered.

-
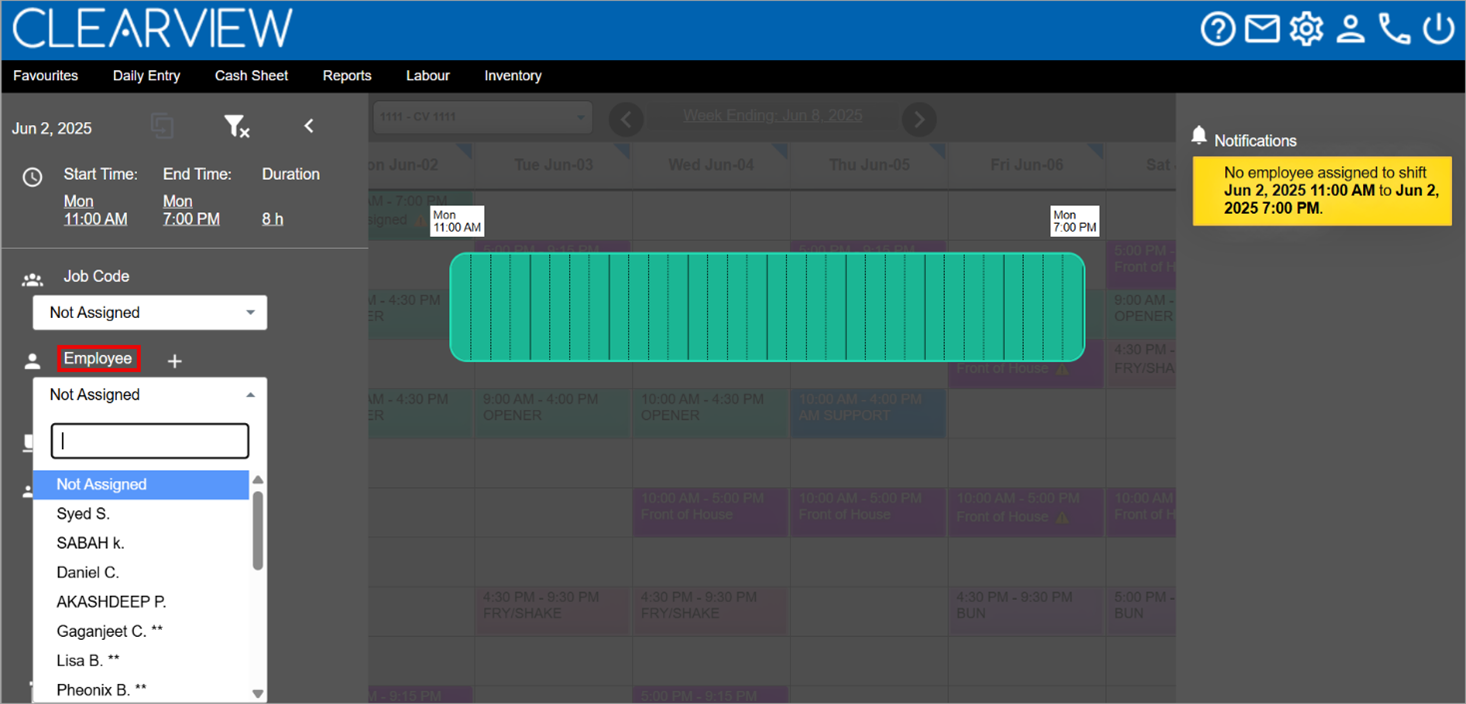
Assign employees to shifts/job: An employee can be assigned to each shift to build a work schedule.
-
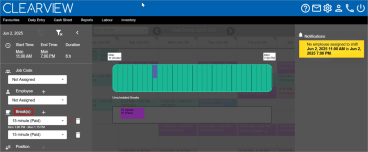
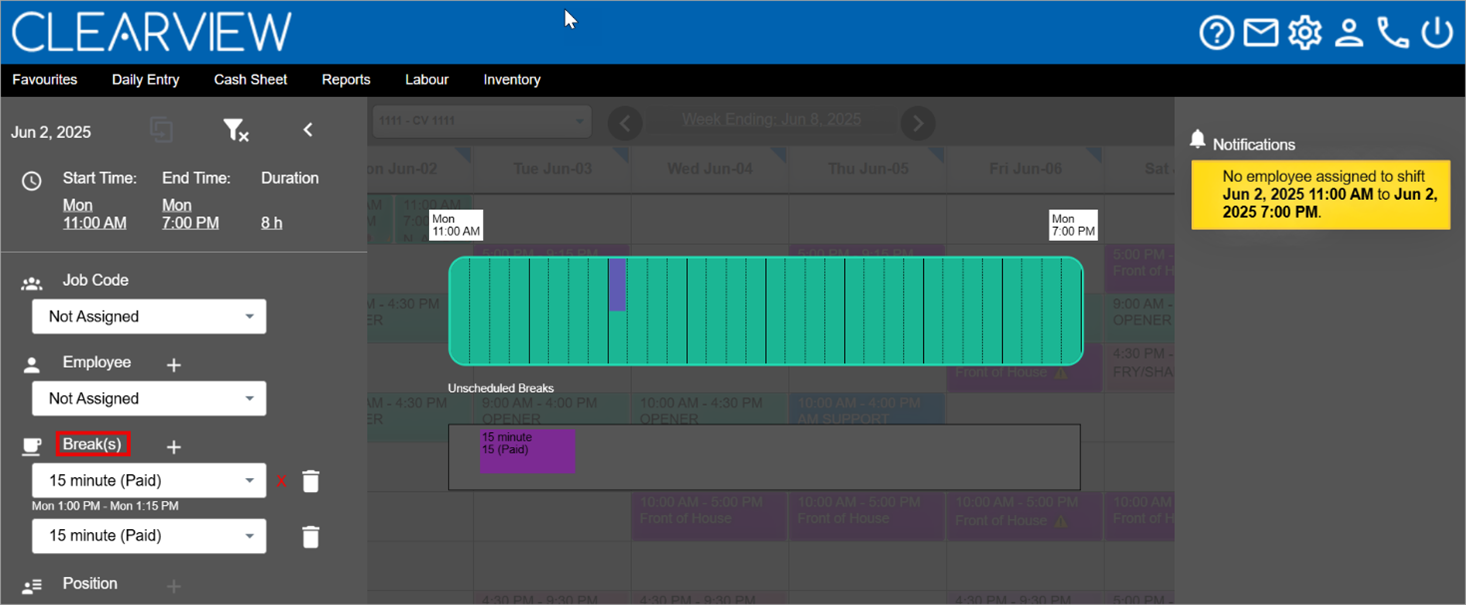
Assign breaks to shifts: Breaks (either unscheduled or scheduled) can be assigned to each shift to account for non-work time.
-
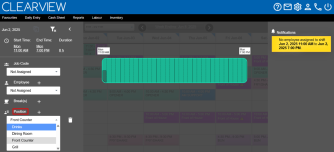
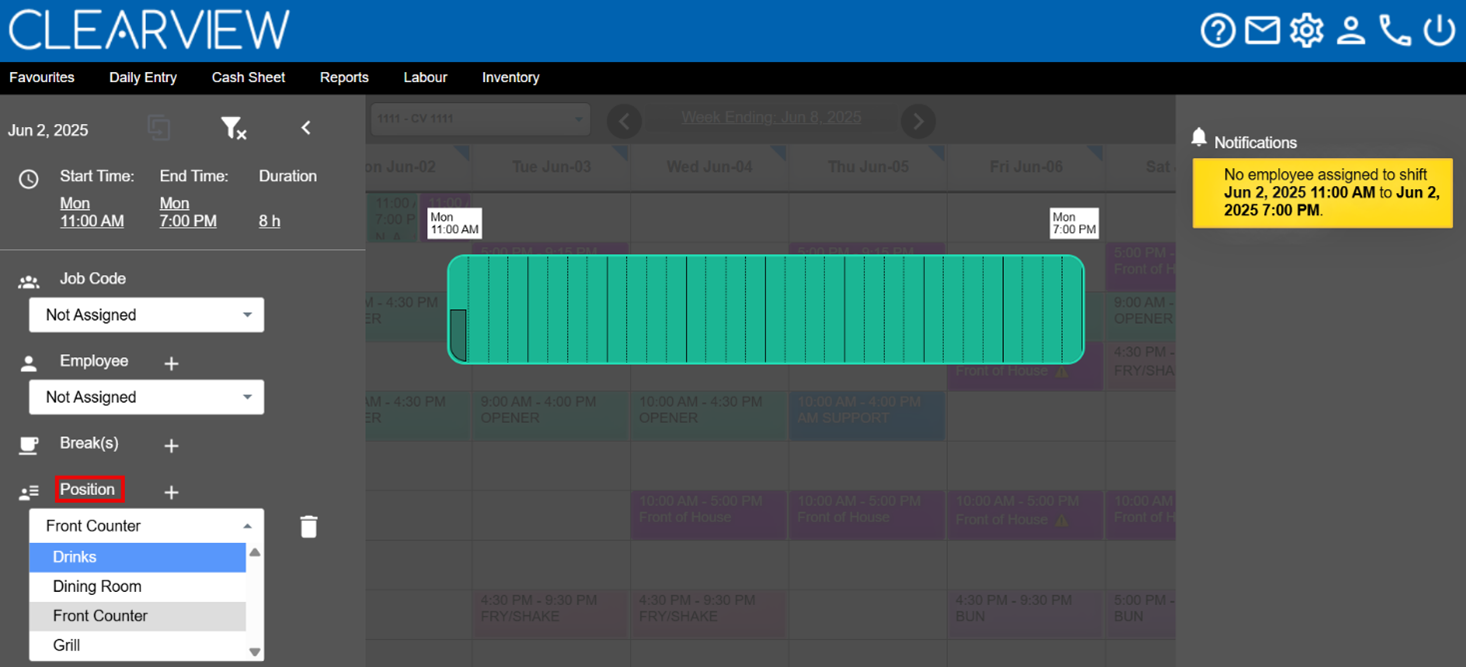
Assign staff positions Different from jobs, positions (or staff positions) are specific roles that employees can take on during a shift (like Cashier, Drive Thru Order Taker, Fry Cook, etc.) and can be used to ensure that all positions are covered when creating a schedule. to shifts: Staff positions Different from jobs, positions (or staff positions) are specific roles that employees can take on during a shift (like Cashier, Drive Thru Order Taker, Fry Cook, etc.) and can be used to ensure that all positions are covered when creating a schedule. can be applied to a part or whole of the shift so that available employees with the skill level can be identified and assigned to the shift.
-
View created schedules: View the created schedule for a day or week, with shifts colour coded based on the job codes. Schedules created can be filtered by job code, employees that have requested at least one day off or employees that have not been assigned any shifts during the week, and sorted based on various options provided.
-
View the statistics for the created schedule: Statistics like ideal vs scheduled labour hours, forecasted sales per period, etc. can be viewed for each period in the day or each day of the week.
-
View total hours: The weekly display mode of the schedule provides the total hours that an employee has been scheduled for the week and the target hours for each employee.
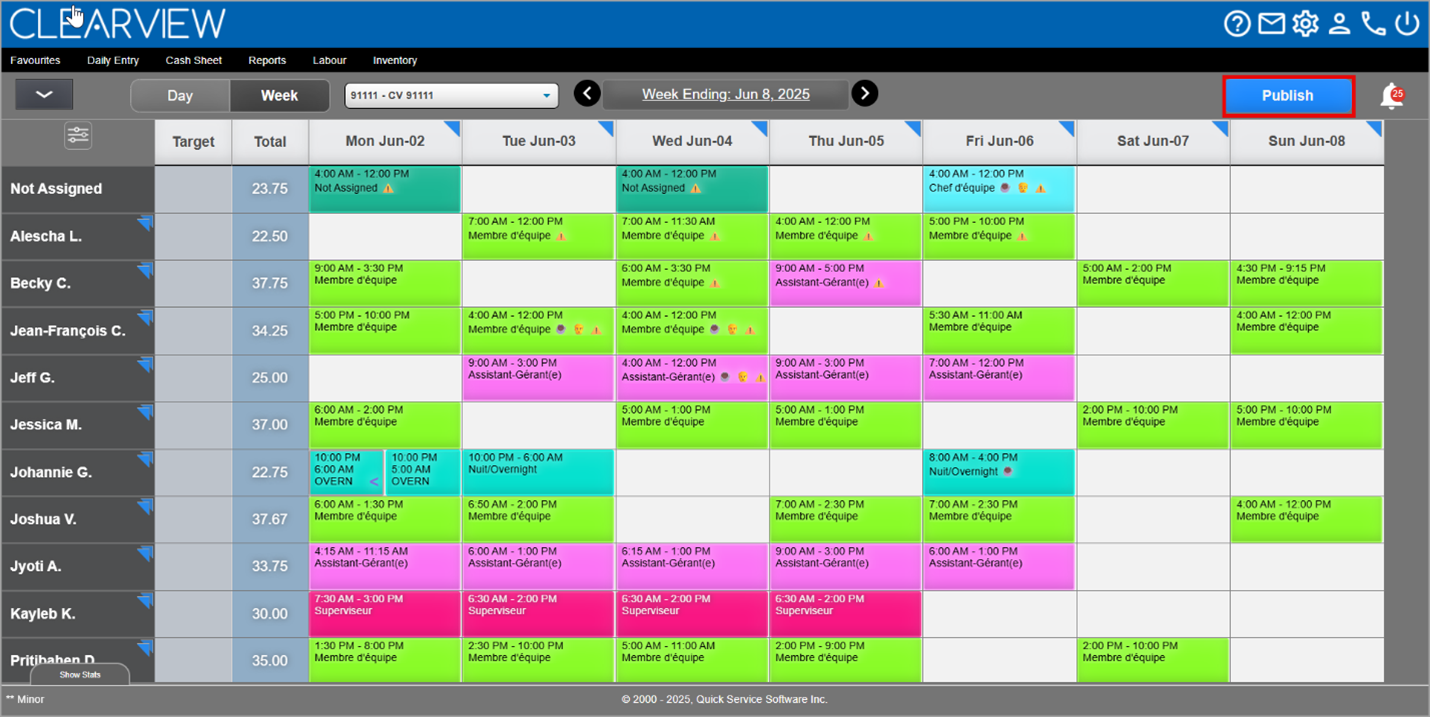
Schedule Interface
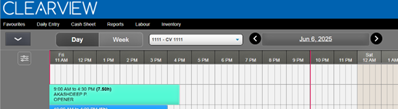
The Schedule - New user interface begins with the main controls at the top of the page.

The main controls include:
-
 : the Menu button.
 -
 : the Daily View toggler.
 -
 : the Weekly View toggler.
 -
 : the Store selector.
 -
 : the Date (or week ending) selector.
Click on
 to view the schedule of a previous day/week or
  to view the schedule for the next day/week.
 -
 : the Publish button.
 -
 : the Notifications icon.
Additionally, the schedule filters are accessible through the ![]() icon below the menu button.
icon below the menu button.
Menu Bar
Clicking on (the menu button) expands the menu bar and displays all the menu buttons.
-
 : adds a shift and opens the Edit Shift window where you can edit the shift start time and length, and assign jobs, employees, breaks, etc.
 -
 : opens the settings section for Schedule - New.
 -
 : opens the preferences section for Schedule - New.
 -
 : opens the tools that can be used to create schedules (create or apply a template, copy a week and apply recurring shifts).
 -
 : lets you select what you want included when you print a schedule and lets you print the schedule.
The print function prints the weekly schedule regardless of whether you're in the daily view or weekly view of the schedule. If in the daily view, it will print the week containing the day.
-
 : sorts all shifts in chronological order (in ascending order based on start time).
 -
 : discards all changes made since the schedule was last published.
 -
 : deletes all the shifts scheduled for the day or week.
 -
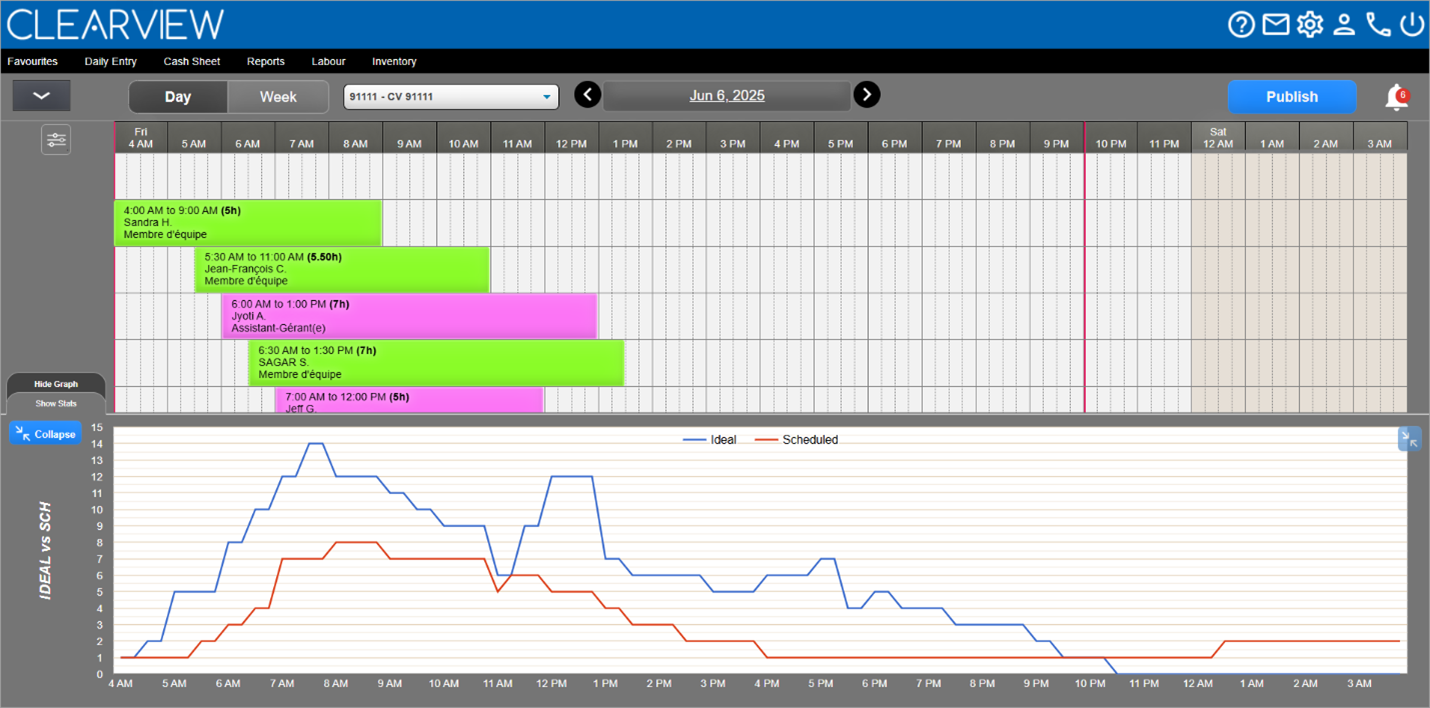
Daily View
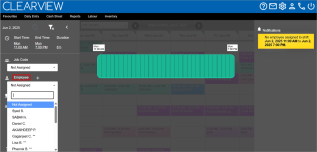
Clicking on the Day button at the top of the page displays the page in daily mode.

The following information is displayed on the page:
-
 indicates that clicking on the feature will provide more information.
 -
 indicates that double clicking on the feature will provide more information.
 -
ᴏ Double clicking on a shift will open the shift so that the shift data can be edited.
-
ᴏ Double clicking on the grid anywhere outside a shift will create a new shift in that location.
-
A grid denoting the open hours of the restaurant.
Click here to learn how to manage the store hours in Update Store Information.
Statutory holidays are indicated in a blue bar at the top of the grid.
Click here to learn how to manage statutory holidays.
-
The shifts created for the day in the form of graphical bars on the grid.
-
The start and end time of each shift is displayed in each graphical bar and the graphical bar spans the shift period.
-
The length of the shift (number of hours) is displayed in each graphical bar.
-
The name of the employee assigned to the shift is displayed in each graphical bar.
Not Assigned indicates that no employee has been assigned to the shift.
-
The job description for the shift is displayed in each graphical bar.
Not Assigned indicates that a job code has not been assigned to the shift.
-
 indicates breaks are included in the shift. The number on the coffee cup denotes the number of breaks included in the shift.
 -
 indicates that CLEARVIEW has generated notifications regarding the shift.
Double click on the shift. The notifications are displayed in the right panel.
-
Shifts are colour coded based on the job code.
-
The colour used for each job code can be changed in Preferences.
-
A darker shade of the colour indicates that staff positions Different from jobs, positions (or staff positions) are specific roles that employees can take on during a shift (like Cashier, Drive Thru Order Taker, Fry Cook, etc.) and can be used to ensure that all positions are covered when creating a schedule. have been assigned to the shift.
-
A striped section within a shift indicates a scheduled break.
-
-
-
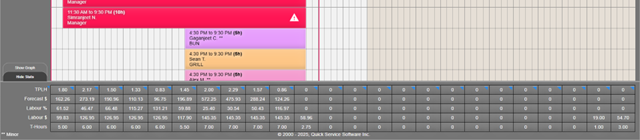
The graph displaying the Ideal (total labour hours required to achieve the target SPLH Sales Per Labour Hour. It is the total sales for the period divided by the number of labour hours logged for the same period.) vs Scheduled (total scheduled labour hours) for each period can be viewed by clicking on the Show Graph tab in the bottom-left corner of the page.
The Show Graph tab is only available if a forecast has been created for the period being viewed.
The statistics for the day can be viewed by clicking on the Show Stats tab in the bottom-left corner of the page.
Only the options selected in the Statistics tab in Settings will display in this section.
Click here to learn how each statistic is calculated
-
Clicking on
in the title column of the statistics section displays the daily totals of each type of statistical data. -
Clicking on
in any other column of the statistics section displays the statistics broken down to every quarter hour of the period.
-

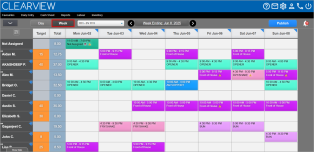
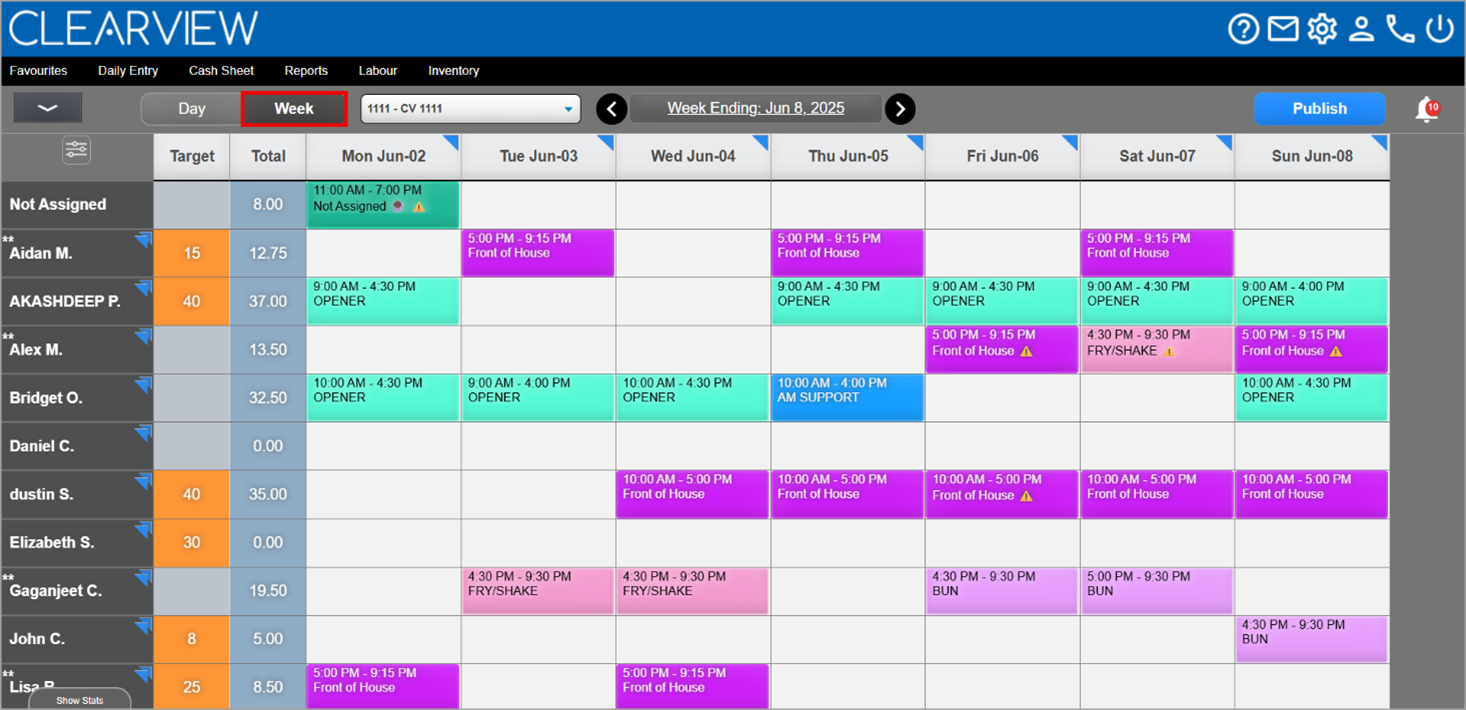
Weekly View
Select Week at the top of the page to view the page in weekly mode.
-
indicates that clicking on the feature will provide more information.
-
indicates that double clicking on the feature will provide more information.
-
ᴏ Double clicking on a shift will open the shift so that the shift data can be edited.
-
ᴏ Double clicking on the grid anywhere outside a shift will create a new shift in that location.
The following information is displayed on the page:
-
The name of the employee.
-
Not Assigned indicates shifts that have been created for the week but employees haven't been assigned to them.
-
Double clicking on the name of an employee will open the electronic employee file for the employee.
-
-
Target*: The target number of works hours to be assigned to the employee for the week.
The target hours for an employee can be managed in the Availability tab of the electronic employee file.
-
Total: The total number of works hours assigned to the employee for the week.
-
Day (where Day is each day of the week selected): The shifts assigned to the employee for each day in the form of a graphical bar.
-
Clicking on a date will open the daily view of the schedule for that day.
-
Statutory holidays are indicated in a blue bar below the date.

Click here to learn how to manage statutory holidays.
-
The start and end time of each shift is displayed in each graphical bar.
-
The job description for the shift is displayed in each graphical bar.
Not Assigned indicates that a job code has not been assigned to the shift.
-
 indicates breaks are included in the shift.
 -
 indicates that CLEARVIEW has generated notifications regarding the shift.
Double click on the shift. The notifications are displayed in the right panel.
-
 indicates positions Different from jobs, positions (or staff positions) are specific roles that employees can take on during a shift (like Cashier, Drive Thru Order Taker, Fry Cook, etc.) and can be used to ensure that all positions are covered when creating a schedule. are included in the shift.
 -
< indicates that the shift started on the previous day.
-
Shifts are colour coded based on the job code.
-
The colour used for each job code can be changed in Preferences.
-
A striped shift indicates that the employee is scheduled to work the shift at a different store within the organization.
-
Days requested off by an employee are indicated in grey along with the time period requested off.
-
Requested off indicates that the leave request has been approved.
-
? Requested off ? indicates that the leave request has not been approved as yet.
-
Double click on the day requested off to view the leave request.
-
-
-
-
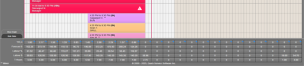
The statistics for the week can be viewed by clicking on the Show Stats tab in the bottom-left corner of the page.
Click here to learn how the weekly statistics are calculated.Clicking on
in a day column of the statistics section displays the statistics broken down by each part of the day. Click on + to break down the statistics by smaller periods.


Publish
Publish sends each employee their schedule for the entire week on TimeShark, and enforces any restrictions set in TimeShark controls (like blocking new leave requests for weeks that have been published).
Notifications
Clicking on ![]() in the top-right corner of the page, will open the notifications box and display all the notifications.
in the top-right corner of the page, will open the notifications box and display all the notifications.
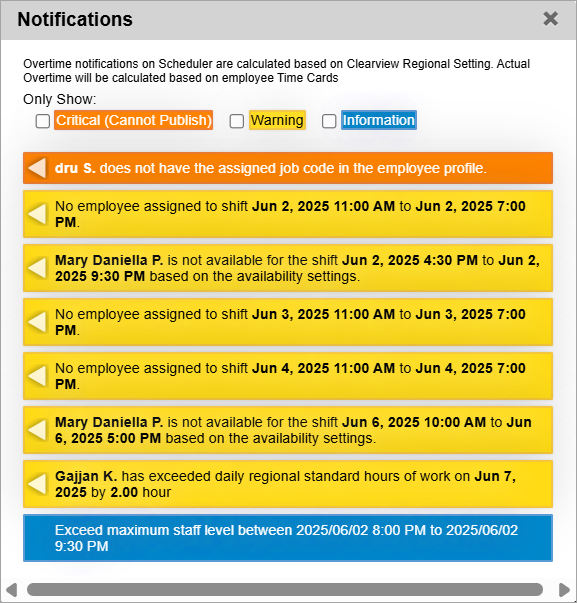
Notifications provide you with details on potential issues with your schedule. The number in the red circle of the notifications icon indicates the number of notifications generated for the shifts displayed, and the absence of a circle indicates that there are no notifications.
There are three types of notifications:
-
Critical: are important notifications that must be addressed. A schedule cannot be published until all critical notifications are resolved.
-
Warning: are notifications indicating constraints that have been breached (like employees not available for the shift, unassigned shifts in the schedule, an employee exceeding the maximum weekly hours, etc), and
-
Information: are notifications that bring potential issues to your attention.
Clicking on a notification highlights the shift to which the notification pertains.
Filters
Filters Drop-down boxes that let you select from the options available. let you set the criteria that determines which shifts are displayed in the schedule (shifts that do not meet the criteria set are hidden).